This chapter contains the following topics:
Introduction to Invoice Formats
This selection allows you to design your own invoices for printing on plain paper or on your company letterhead. You can specify which information to show in the invoice's header and footer areas, and how the billing information is to print on the invoice.
This selection allows you exact control over how your billing information is printed on invoices. You can design your billing information to be printed very simply and concisely, or in as much detail as you wish. Matters can be billed in detail, snowing the charge for each service and expense, or showing only a summary of the charges by group or a summary by service/expense code. The simplest invoice that you could design would show only the net due for the invoice.
You can define a different format for the additional pages of an invoice. When the invoice requires more than one page to print, the additional page format will be used to print the remainder of the invoice. This allows you to customize your invoice format for the "second" sheets of your company letterhead.
Using this selection, you enter attachment formats just like invoice formats. An invoice can have up to three "attachments" so that you can present billing information to your clients exactly as you want. When you print invoices using Invoices (Print), the attachments will print immediately after each invoice. You could, for example, enter an invoice format that shows only the total billed for a matter and the invoice net due. For this invoice, you could then enter an attachment format that gives a detailed listing of all the services for the matter.
You can design invoices combined with statements if you answered Y to "Use combined invc/stmnt ?" in T/B Control information. Such an invoice would include, for example, the client's previous balance, the charges on the invoice, the balance for the statement period, and the new client account balance.
|
Note |
T/B comes with several predefined invoice formats. For more information, see the appendix titled Predefined Data. |
First, here are definitions of some terms used in this chapter to describe the invoice formatting process.
Location Grid
The field location grid is a set of vertical and horizontal lines of numbers which you can print on your company letterhead to aid in positioning information so that it fits correctly between the margins, header, and footer of the letterhead.
Invoice Layout Worksheet
The invoice layout worksheet is a set of numbered vertical and horizontal lines which you can print on a blank sheet of paper if you want to create your invoice on plain paper.
In either case, the basic concepts are:
Line or Row
This means the number of print lines down from the top margin.
Column
This means the number of spaces to the right of the left print margin.
Location
A location means the row and column of the printed information on the page.
The invoice format consists of three areas:
| • | The header area is the first part of the invoice and usually includes information such as your company name and address, your client's name and address, and the invoice date. |
| • | The line item area is the middle part of the invoice where the billing information is printed. It includes flat fee charges, charges for matters, adjustments, retainer billings, and the invoice total. If you are using a combined invoice/statement, it also includes the statement information. |
| • | The footer area is the bottom part of the invoice and usually includes the page number. |
For the footer and header areas, you can specify the format for the invoice's first page and for additional pages of the invoice. The format for the line item area is constant from page to page, but its size can differ for the first page as compared to additional pages. This allows you to lay out one format for the first page, which would usually print on your letterhead, and another format for your "second" sheets of paper, which would be used only when a client's invoice is longer than one page.
The following will give you an overview of the steps involved in creating an invoice. Each of these steps will be explained in detail in the following sections of this chapter.
First, if your invoice will be printed on preprinted company letterhead, use the Location grid function to print a grid on top of that letterhead. Then you can see where the preprinted information is located on the letterhead.
If the invoice will be printed on plain paper, use the Layout worksheet function to print a layout worksheet on plain paper. Then sketch the layout of your invoice on the worksheet.
Now that you have an idea of what your invoice will look like, use the Invoice formats (General appearance) function to describe the invoice's general appearance (the number of rows and columns on the letterhead or paper, the number of rows in the invoice closing area, where the line item area starts and ends, etc.).
Then use the Header area, first page function to choose the fields that you want in the top portion of the invoice's first page and position them where you want them to print. (If you are using plain paper, you can simulate company letterhead by choosing your company name and address fields.)
If the layout of the header area for additional pages will be the same or similar to the one you defined for the first page, use the Copy first page header area function to copy the first page header area format for use on additional pages.
Use the Header area, additional pages function to choose the fields that you want in the top portion of the invoice's additional pages and position them where you want them to print. If you copied the header area format from the first page, you can use this function to make changes to the new (copied) format.
Next, use the invoice Line item area function to choose and position the fields for the invoice billing information.
Then use the Footer area, first page function to choose the fields that you want in the bottom portion of the invoice's first page and position them where you want them to print.
If the layout of the footer area for additional pages will be the same or similar to the one you defined for the first page, use the Copy first page footer area function to copy the first page footer area format for use on additional pages.
Use the Footer area, additional pages function to choose the fields that you want in the bottom portion of the invoice's additional pages and position them where you want them to print. If you copied the footer area format from the first page, you can use this function to adjust the new (copied) format to be exactly as you want it.
After you have selected and placed all of the fields for your invoice, use the Verify function to obtain a list of any problems (such as overlapping fields) that would prevent you from printing the invoice. If any problems are indicated in the Verify report, use the appropriate Enter function to correct them.
Then use the Sample invoice function to print a sample invoice. If you are using preprinted letterhead for the invoice, the sample will show you how your fields fit on the letterhead, so that you can make any adjustments needed.
Finally, use the Format specifications function to print a list of your invoice specifications which can be filed for later reference.
When you want to create another invoice, if it is similar to an existing one that you have already designed, you can use the Copy function to copy the existing one to the new invoice format. Then use the functions described above to tailor die new (copied) format, rather than having to create it from scratch.
This chapter describes how to create an invoice in the same sequence as described above.
The field location grid is a tool to help you lay out your invoice properly when you are using preprinted letterhead. When you print this grid on top of your letterhead, you will see the exact rows and columns of every piece of letterhead information. You will then be able to specify the exact row and column for each piece of information when you use the Enter function described later in this chapter.
|
Note |
Use the appendix titled Invoice Fields to aid you in laying out your fields on the location grid. This appendix lists all of the fields available for printing, with the definition, length, and appearance of each. |
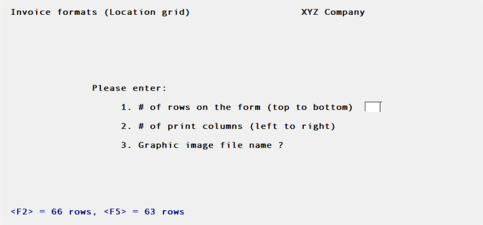
Select
Location grid from the Invoice formats menu.
The following screen will be displayed:
1. # of rows on the page (top to bottom)
Enter the number of rows to appear on the grid. The number you enter here corresponds to the number of rows on your letterhead. You can also use the option:
|
<F2> |
To use 66 rows, which corresponds to regular 8-1/2" x 11" paper, 6 rows/inch, with no top or bottom margins |
|
<F5> |
To use 63 rows, which also prints on a regular 8-1/2" x 11" paper, 6 rows/inch. Use this setting to print to a Windows printer which usually will not accept 66 rows |
|
Format |
99 |
|
Example |
Press F2 |
2. # of print columns (left to right)
Enter the number of print columns to appear across the page on the grid, up to 132, or use the option:
|
<F2> |
To use 80 columns, which corresponds to regular 8-1/2" x 11" paper, 10 characters/ inch, with 1/4" left and right margins |
|
Format |
999 |
|
Example |
Press F2 |
3. Graphic image file name ?
Enter Y if you want to print to Windows printer with a background jpeg or bitmap image.
|
Format |
1 character (for the question) 12 characters (for the file name) |
|
Example |
Enter N (for the question) Not used with this example (for the file name) |
The printer selection screen appears. Choose a printer.
The printer should always be ready to print in location 1, 1 (that is, row 1, column 1).
If you are using multiple printers, select the printer to be used. Enter the printer control code. If the printer control code that you enter specifies more than one paper bin, you are asked which bin to use for the location grid.
You then see:
"If you wish to print the grid on your company letterhead, make sure your letterhead is now in the printer, and that the printer will begin printing at the first print position of the very first line of the letterhead. Type 'DONE' when ready."
Type DONE and the grid prints.
After the grid is printed, you are asked whether you want to print it again.
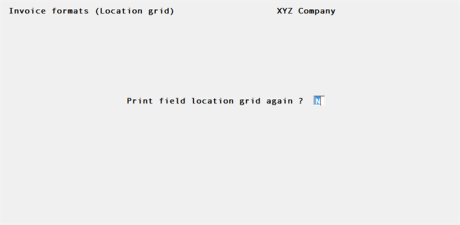
If you answer Y, you are asked "Which bin" (if the printer control code specifies control codes for the "2nd page bin"), and another grid prints. If you answer N, you are asked to mount regular paper.
The layout worksheet is a tool to help you lay out your invoice on blank paper. (The location grid is used to design an invoice for printing on plain paper.) Whereas the location grid has rows and columns of numbers, the layout worksheet has rows of dotted lines on which you can fill in invoice information in the way you want it printed on blank paper.
|
Note |
Use the appendix titled Invoice Fields at the end of this manual to aid you in laying out your fields on the layout worksheet. This appendix lists all of the fields available for printing, with the definition, length, and appearance of each. |
You can print the layout worksheet on your company letterhead as well, if you prefer it over the location grid.
Select
Layout worksheet from the Invoice formats menu.
The following screen will be displayed:
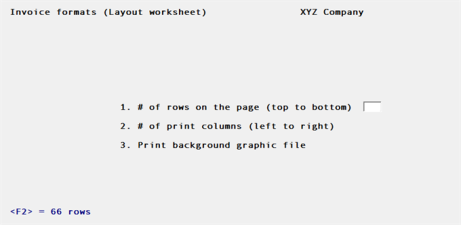
1. # of rows on the page (top to bottom)
Enter the number of rows to appear on the grid. The number you enter here corresponds to the number of rows on your letterhead. You can also use the option:
|
<F2> |
To use 66 rows, which corresponds to regular 8-1/2" x 11" paper, 6 rows/inch, with no top or bottom margins |
|
Format |
99 |
|
Example |
Press F2 |
2. # of print columns (left to right)
Enter the number of print columns to appear across the page on the grid, up to 132, or use the option:
|
<F2> |
To use 80 columns, which corresponds to regular 8-1/2" x 11" paper, 10 characters/ inch, with 1/4" left and right margins |
|
Format |
999 |
|
Example |
Press F2 |
3. Graphic image file name ?
Enter Y if you want to print to Windows printer with a background jpeg or bitmap image.
|
Format |
12 characters |
|
Example |
Pres F2 |
The printer selection screen appears. Choose a printer.
The printer should always be ready to print in location 1, 1 (row 1, column 1).
If you are using multiple printers, select the printer to be used. Enter the printer control code. If the printer control code that you enter specifies more than one paper bin, you are asked which bin to use for the layout worksheet.
You then see:
"If you wish to print the worksheet on your company letterhead, mount the letterhead on the printer now. Type 'DONE' when ready."
Type DONE and the worksheet prints.
After the worksheet has printed, you are asked whether you want to print it again. If you answer Y, you are asked "Which bin" (if the printer control code specifies control codes for the "2nd page bin"), and another worksheet prints. If you answer N, you are asked to mount regular paper.
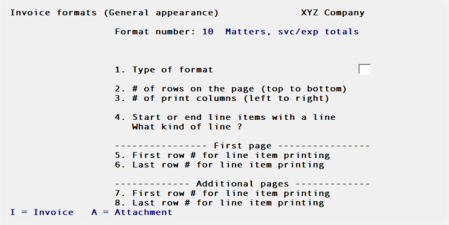
To enter an invoice format, the sequence of steps to follow is:
| 1. | Use General appearance to specify the general, over-all appearance of the format: how long, how wide, etc. |
| 2. | Use Header area, first page to select which fields or texts to print in the header area of the first page of the invoice, where they should print, and how they should look. Then use Header area, additional pages to lay out the header area of additional invoice pages. If the header area for additional pages is similar to that of the first page, use Copy first page header area to copy the first page format. |
| 3. | Next, use Line item area to select which fields or texts to print in the line item area of the invoice. |
| 4. | Use Footer area, first page to lay out the footer area of the first page of the invoice. Then use Footer area, additional pages to lay out the footer area of additional invoice pages. If the footer area for additional pages is similar to that of the first page, use Copy first page footer area to copy the first page format. |
| 5. | Use Verify to check the format for errors. Make any corrections necessary. |
| 6. | Use Sample invoice to confirm that the format is what you want. |
Select
General appearance from the Invoice formats menu.
The following screen will be displayed:
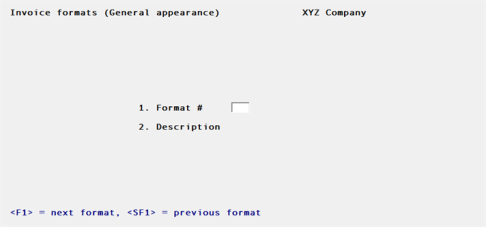
A screen appears for you to either assign a number and description to the new invoice format you are about to add or to retrieve an existing format to change:
1. Format #
If you are adding a new format, enter a new number to identify it. If the format is not on file, you are asked to enter the description of the new format.
If you want to change an existing format, enter its number, or use the option:
|
<F1> |
To scan through the formats on file |
|
<SF1> |
To scan through previous formats on file |
|
Format |
99 |
|
Example |
Type 4 |
2. Description
For a new format, enter a description of it. For an existing format, the description displays automatically.
|
Format |
25 characters |
|
Example |
Type Matters, svc/exp summary |
This screen appears:
Enter the information as follows:
1. Type of format
Enter I if this is an invoice format, A if it is an attachment format.
|
Format |
1 character |
|
Example |
Type I |
2. # of print rows (top to bottom)
Enter the number of rows on the page, or use the option:
|
<F2> |
To use 66 rows, which corresponds to regular 8-1/2" x 11" paper, 6 rows per inch |
|
Format |
99 |
|
Example |
Press F2 |
3. # of print columns (left to right)
Enter the number of columns on the page (up to 132), or use the option:
|
<F2> |
To use 80, which corresponds to regular 8-1/2" x 11" paper, 10 characters per inch |
|
Format |
99 |
|
Example |
Press F2 |
4. Start or end line items with a line
Specify whether to start or end, or both start and end the line item area with a line:
|
1 |
Start only |
|
2 |
End only |
|
3 |
End only |
|
Enter |
None |
If you specify to print a line at the start of the line items, a line will print on the first row # for line item printing. If you specify to print a line at the end of the line items, a line will print on the last row # for line item printing. This applies to the first page and additional pages.
|
Example |
Press ENTER |
What kind of line
Specify what kind of line to use:
|
1 |
Dashed line |
|
2 |
Double dashed line |
|
3 |
Solid line |
|
Enter |
Double solid line |
|
Note |
Your printer must support the IBM extended character set to properly print the solid line or the double solid line. |
|
Example |
(This field is skipped) |
5. First row # for line item printing (First page)
Enter the first row # on which line items will be printed on the first page of the invoice.
Be sure to leave room for the header area and for any blank rows to separate the header area from the line items.
|
Format |
99 |
|
Example |
Type 21 |
6. Last row # for line items printing (First page)
Enter the last row # on which line items will be printed on the first page of the invoice.
Be sure to leave room for the footer area and for any blank rows to separate the footer area from the line items.
|
Format |
99 |
|
Example |
Type 59 |
7. First row# for line item printing (Additional pages)
Enter the first row # on which line items will be printed on additional pages.
Be sure to leave room for the footer area and for any blank rows to separate the header area from the line items.
|
Format |
99 |
|
Example |
Type 6 |
8. Last row # for line item printing (Additional pages)
Enter the last row # on which line items will be printed on additional invoice pages.
Be sure to leave room for the footer area and for any blank rows to separate the footer area from the line items.
|
Format |
99 |
|
Example |
Type 60 |
Make any changes as usual. You then see:
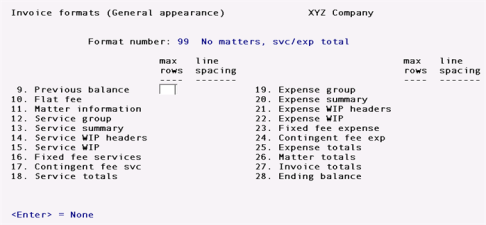
There are many different types of billing information (invoice line items) that can appear in the line item area. Use this screen to specify the maximum number of rows and the line spacing for each type of line item that you want to appear in your invoice.
Enter the following information for fields 9 through 28:
max rows
Enter the maximum number of rows in the format for this type of billing information. When you use the Line item area function to specify fields and text for this type of billing information, you will have the number of rows that you enter here as the maximum to work with in the format. For example, if you enter 3 for field 9, "Previous balance", you will have three rows available in the format for the placement of "Previous balance" fields. You may also use the option:
Option: ENTER For "None", if you do not want to print this type of billing information on the invoice
|
Format |
99 |
line spacing
Enter the line spacing for this type of line item. This specifies the number of blank lines to be printed between this type of line item and the one following it. For example, if you specified double spacing for Flat Fee Information, one blank line would print between a flat fee and the next type of billing information on the invoice.
In the case of a repeating line item, such as Service WIP, this also specifies the line spacing between each line item of the same type. For example, if you specified double spacing for Service WIP, one blank line would print between each Service WIP item printed on the invoice.
Enter either:
|
1 |
For single spacing (no blank lines) |
|
2 |
For double spacing (one blank line) |
|
3 |
For triple spacing (two blank lines) |
Make any changes as usual. Then you will see:
Enter the following information:
29. WIP print order
What you enter here determines whether service WIP and expense WIP will print in date order or service/expense # order.
Enter either:
|
1 |
To print WIP in date order |
|
2 |
To print WIP in service/expense # order |
|
Note |
If you choose to print WIP in date order, the software will not allow you to select the following line types in the Line item area function: Service group. Service summary, Expense group, and Expense summary. These line types are only useful when WIP is printed in service/expense # order. |
|
Format |
9 |
|
Example |
Type 2 |
Default Billing Descriptions
30. Flat fee retainer
31. Contingent fee
32. Fixed fee
33. Matter adjustment
34. Adv bill retainer
Enter the default billing description for each of the above billing items. When the bill item lacks a billing description of its own, the default description will print on the invoice in place of the "Billing description" fields.
For example, in the case of a Flat Fee Retainer that was entered without a billing description, the description that you enter for field 30 will be printed on the invoice when this retainer is billed.
These fields use Passport's text editing function. You enter text in much the same way as most word processing programs, using the ENTER key, arrow keys, DELETE key, ESC when done, etc. When you are finished entering text, press ESC and follow the screen instructions.
|
Format |
Ten lines of description each, up to the maximum service/expense billing text length specified in Control information. (The first non-blank line of each description will appear on the screen.) |
|
Example |
Press ESC and then ENTER at each field |
35. Service WIP items
36. Expense WIP items
Your choice here determines what will be used as the default billing description for service/expense WIP items.
Enter one of the following:
|
1 |
To use the service/expense billing description as the default billing description |
|
2 |
To use the 25-character service/expense description as the default billing description |
|
Enter |
For no default billing description |
|
Example |
Press ENTER twice |
37. Attachment 1 fmt
38. Attachment 2 fmt
39. Attachment 3 fmt
(These three fields do not appear for an Attachment type of format.)
Enter the format numbers for up to three attachments, or press ENTER for none.
The attachments will print after each invoice in the order that you specify. The format for each attachment must be entered separately as another format.
|
Format |
99 |
|
Example |
Press ENTER |
Make any desired changes or press ENTER to return to the T/B menu.
Here you choose which information (fields) you want to print in the header area of your invoice's first page. You can also enter text to print in the header area of the invoice.
When you select a field to print, you are not selecting the title of the field to print, only the actual information to print. For example, if the field is "Client name" and the information in the field is "XYZ Company", you are selecting to print "XYZ Company", not the "Client name" title. If you want to print a title on the invoice, you must specify a piece of text to print. This is explained in detail later in the section titled "Inserting Text on the Invoice".
Select
Header are, first page from the Invoice formats menu.
The following screen appears:
1. Format #
Enter the format number.
2. Description
This field fills in automatically.
(See the appendix titled Invoice Fields at the end of this manual for an explanation of each of these fields.)
Select ENTER and the following screen displays:
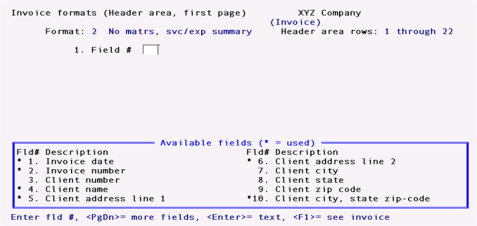
1. Field #
Enter the number of the field that you want to select for the invoice, or use one of the options:
|
ENTER |
To enter a piece of text (explained later in the "Inserting Text on the Invoice" section of this chapter) |
|
F1 |
To see a picture of your invoice (explained later in this chapter, after the "Date Fields" section) |
|
PgDn |
To scan through additional fields |
If you press PgDn, you see:

If you press PgDn again, you see:

You can return to previous screens by pressing PgUp.
|
Example |
Use PgUp until you return to the first screen. Then enter 4 for "Field #" to select "Client name". |
This screen appears:
This screen allows you to specify where to print the selected field ("Client name") and how you want it to look when it is printed.
The appearance of this screen below "Row" and "Column" depends on what type of field you have selected. A field will be one of three types, depending on the type of information that it contains:
Alphanumeric fields may contain any combination of letters, digits, and special symbols.
Date fields only contain dates.
Numeric fields only contain digits, along with any decimal points, minus signs or parentheses (for negative numbers), and commas.
Alphanumeric Fields
Because the example, "Client name", is an alphanumeric field, instructions for this type of field are given first.
All alphanumeric fields allow the same set of choices, as shown in the screen above. The maximum size of the field depends on the particular field chosen. Enter the information for an alphanumeric field as follows:
2. Row
Specify in which row to print this field.
|
Format |
99 |
|
Example |
Type 16 |
3. Column
Specify the starting column in which to print this field.
|
Format |
999 |
|
Example |
Type 8 |
4. Length to print (maximum = )
Enter the number of characters you want to print in this field, up to the maximum number shown. The "maximum" number shown is the size of that field as it is stored in the software. You can choose to print all or part of the information in this field.
|
Format |
99 |
|
Example |
Press ENTER |
5. Justify
Here, "justify" means to adjust characters within the space allowed.
|
Example |
Press ENTER |
A group of characters is "left justified" when it is aligned with the left-hand margin of the space; that is, there are no blank spaces between the left-hand margin and the first character. (This paragraph is "left justified".)
A group of characters is "right justified" when it is aligned with the right-hand margin of the space; that is, there are no spaces between the right-hand margin and the last character. (This paragraph is "right justified".)
Enter either:
|
ENTER |
To accept the default of L (left justification) |
|
R |
To right justify |
|
N |
For no justification (to print the information exactly as it was entered) |
|
Example |
Press ENTER |
|
Example |
Now press ENTER at "Field number to change ?", so that you are back at "Field #", ready to select another field. Select "Invoice number" by entering 2. |
You see this screen:
*SCREEN*
Numeric Fields
If you select a numeric field that lacks decimals, such as "Invoice number", the screen has the above appearance.
The choices for a numeric field depend on the characteristics of that particular field. For instance, its maximum length, whether negative numbers are allowed, does it have any decimal places, etc.
The "Invoice number" field cannot be negative. It cannot contain decimals or decimal places, so the screen appears as above. An example of a numeric field that can be negative, and can have decimal places and commas, is shown in an example in the "Line Item Area" section later in this chapter.
For this example, enter a "Row" of 19 and a "Column" of 66. After specifying the "Row" and "Column", you would specify the remainder of the information as follows:
4. Number of integers
Enter the number of integers you want to print in this field, up to the maximum shown above, or use the option:
Option: ENTER To print the maximum
|
Example |
PPress ENTER |
Example: Press ENTER to accept the default of 6
5. Print lead zeros ?
Answer Y if you want to print leading zeros when they occur in this number; otherwise, answer N. For instance, if the "Invoice number" is 4 and you answer Y here, it will print as "000004"; if you answer N, it will print as "4".
|
Example |
Type N |
Example: To continue the example, press ENTER at "Field number to change ?" so that you are back at "Field #", ready to select another field. Select "Invoice date" by entering 1.
You see this screen:
*SCREEN*
Date Fields
If you select a date field such as "Invoice date", the screen will have the above appearance.
|
Example |
For the "Invoice date" field, enter a "Row" of 7 and a "Column" of 5 6 |
4. Date format to use
Enter one of these choices for how the date is to be printed:
|
1 |
MM/DD/YY |
|
2 |
MM/DD |
|
3 |
DD-MMM-YY |
|
4 |
DD-MMM |
|
5 |
Month fully spelled |
When you make the choice, the "Will look like:" on the right side of the screen shows how the date will look. The length of the field displays so you will know how much room this field will occupy on the invoice.
|
Example |
Type 5 |
Press ENTER at "Field number to change ?" to return to "Field #'
Example: Press F1 to see your invoice and you see:
*SCREEN*
While entering the invoice specifications, you can press F1 to see a picture of the invoice. This will give you an idea of the appearance of your invoice.
The width of the invoice will be what you entered previously for "# of print columns" in General appearance. The number of lines will be what you entered for "# of print rows".
"X's" will appear to represent the alphanumeric fields that you have selected for the invoice, and will occupy the length and locations you have selected. "9's" will appear for your numeric fields. Dates will be represented differently, depending on the format you have chosen for the date. "?'s" will appear where any of the fields overlap, in which case you need to change the position of a field.
Options:
|
T |
To scroll your invoice up and down by one row at a time. This is useful to bring a row I to the bottom of the screen to be near the column numbers, where you can more easily judge a field's column position. |
|
PgUp |
To shift your view of the invoice up and |
|
PgDn |
down by a screen-full at a time. This is useful when your invoice size is larger than can be displayed on the screen. |
|
F2 |
To shift your view to the right edge of the invoice. This is useful when your invoice size is wider than can be displayed on the screen. Once you have used F2 to shift to the right, press it again to shift back to the left. |
|
F5 |
To view the layout of additional pages. |
|
ESC |
To leave this "view invoice" screen and return to the layout screen. |
|
Note |
In the line item area, the screen will only show the fields and text for one type of line item at a time. When you view the invoice format while entering header or footer information, the line item type that first occurs in the format will be shown. When you are entering information for a line item, only that particular type of line item will be displayed. |
|
Example |
Press ESC to leave this screen and you are back at "Field #", ready to select another field. |
Press ENTER without entering a number and you see:
*SCREEN*
This allows you to enter text and position it where you want it to print on each invoice. You can also use this option to print dashed lines (" ") or symbols on your invoices.
The following explains how to define textual information to print on your invoice.
1. Field #
To specify text, just press ENTER. "Text" appears in this field, to indicate that you are working with text rather than fields.
2. Row
Enter the row in which you want the text to print.
|
Format |
99 |
|
Example |
Type 19 |
3. Column
Enter the column in which you want the text to begin printing.
|
Format |
999 |
|
Example |
Type 56 |
A ruler appears, with numbers starting at the column you just specified and extending up to 50 columns. The ruler stops at the right-hand edge of your invoice. If your invoice has at least 50 more columns to the right of the starting column for this text, the ruler is 50 columns long. Otherwise, it is shorter.
(In the example above, the ruler starts at column 56 as specified, and extends for 25 columns to column 80.)
4. Text
Enter the exact text you want to appear in that location.
|
Example |
Type Invoice # |
5. Suppress ?
Answer Y if you want the text to be suppressed (not print) when some field (to be specified next) is zero or blank.
Press ENTER (for default of N) if you want the text to always print.
|
Example |
Type Y to suppress the text |
Field #
If you answered Y to "Suppress ?", the available item fields will display. Enter the number of the field which, when it is zero or blank, will cause the text not to print. The field you select here does not have to appear on the invoice.
|
Example |
Type 2 |
(Press F1 to see how your text appears on the invoice.)
Now press ENTER at "Field number to change ?" to return to "Field #", ready to select another field.
Next, you will learn how to delete text and change its location or content.
Changing or Deleting Text
To delete a text, or to change the location or wording of a text you have entered, get to the text screen by pressing ENTER at the (blank) "Field #" field.
A window shows information on the texts already entered.
To delete a piece of text, enter its row and column number, then press F3 when prompted to do so.
To change the wording of the text, enter its row and column number, select field 4, and enter the new wording. You can also change the "Suppress ?" information by selecting field 5 and entering a new answer or new field number.
To change the row or column in which the text starts, enter its current row and column numbers. Then select field 2 or 3 and enter the new row or column number.
|
Example |
Press ESC at "Field number to change ?" to leave the text unchanged |
Next, you will learn how to change the location and appearance of a field that you have previously selected to print on your invoice.
Sometimes you will need to change the appearance or print location of a field that you have already selected to appear on your invoice.
This section will tell you how to change a field's appearance, change its location, delete it, or print it in additional locations on the invoice.
The first step is to select the field that you want to modify by entering its number in "Field #".
|
Example |
Type 1 |
The field usage window shows how many times that you have used this particular field in your invoice and where you have used it. You can use each field up to four times. In this example, "Invoice date" has only been used one time, in row 7, column 56.
The next step is to select which usage of the field you wish to modify by entering its row in "Row", then its column number in "Column".
|
Example |
Type 1 |
Example: Type 7 for "Row", then type 56 for "Column".
From "Field number to change ?" you can select and change any of the information about this field.
Enter a field number to change, or use one of the options:
|
F1 |
To see a picture of the invoice (as described earlier in the chapter) |
|
F3 |
To delete this particular usage of the field |
(any other usages will not be affected)
|
Example |
Enter 3 at "Field number to change ?" to enter a new "Column". Enter 60 for "Column" so that the "Invoice date" field will now print in column 60 of the invoice. (Press F1 if you want to see the change in location for "Invoice date".) |
After making changes, press ENTER at "Field number to change ?" and you will be back at "Field #", ready to select another field.
You can print any field in up to four different locations in the header area.
To use a field again, enter its number in "Field #"
|
Example |
Type 4 at "Field #" to use "Client name" again |
The field usage window displays the row and column for any existing usages of this field. At this point, you can enter the row and column of an existing usage to modify it, or enter the row and column of a new usage. When you print your invoice, this field will print in all of the locations that you have specified.
|
Example |
Press ESC to exit without entering another usage for "Client name" |
Example Information:
You do not have to complete this example invoice format (unless you want the practice), since several predefined formats are included in .zip and .tar files.
If the format for the header area of additional invoice pages will be the same or similar to that of the first page, use this function to copy the first page format. Then use the Header area, additional pages function to make any changes necessary to the format.
Select
Copy first page header area directly from the Invoice formats menu.
If you are using the menu bar, you will be asked to enter the format # that contains the header area you want to copy. After you have chosen the format, the format for the first page header area is copied to the header area format for additional pages.
If you have already defined the format for the additional page header area, a warning message will appear to tell you that the existing format will be completely replaced. You are asked "Do you really want to do this ?". If you answer Y, the format of the first page header area is copied and completely replaces the existing format. Answer N to return to the menu without copying.
A screen appears while the header area is copied. When the copying is complete, press ESC to return to the menu.
Adding, changing, or deleting header area fields and texts for additional pages is handled in exactly the same way as header area fields and texts for the first page.
Select
Header area, additional pages directly from the Invoice formats menu.
On the first screen enter this field:
1. Format #
Enter the format number of the form you wan to modify.
On the next screen you enter the fields for the format. Select ENTER and "Field number to change ?"and you see:

(See the appendix titled Invoice Fields for an explanation of each of these fields.)
There are two more windows of header fields for additional pages, which you can see by pressing PgDn:


The "line item" area is the area of the invoice where all fees, charges, credits, and adjustments to a client are printed.
Select
Line item area directly from the Invoice formats menu.
1. Format #
Enter the format number of the form you wan to modify.
On the next screen you enter the fields for the format. Select ENTER and "Field number to change ?"and you see:

Before entering line item information, you must select the type of line item that you want to define. It is not necessary to define every line type. You need only enter information for the line types that you want to use in your invoice.
If you want to define a very simple invoice, you could use the Invoice totals line type to select the "Invoice net due" field, and then enter some descriptive text adjacent to this field, such as "Amount due for services rendered". If you are using combined invoice/statements, and you want to define a simple invoice/ statement, you could use the Ending balance line type to select the "Previous balance", "Invoice net due", and "Balance due" fields, and then enter some appropriate text to describe each field.
Use the up/down arrow keys to select a line type, then press ENTER.
Adding, changing, or deleting line item fields and texts is handled in exactly the same way as header area fields and texts, except that the row refers to the relative row, not the absolute row. That is, row 2 for a particular line item type means the second row from the top of the line item area for that line type, not the second row from the top of the page.
|
Note |
The number of rows available for the format of each line type will be what you specified in General appearance. |
The following sections show the fields available for each line type. (See the appendix titled Invoice Fields for an explanation of each of these fields.)
Previous Balance
(This selection is not available if you specified in Control information that combined invoice/statements are not used.)
When you are using combined invoice/statements, you can use this section of the line item area to show the statement's previous balance, statement date, etc.
The fields available for Previous Balance are:
*SCREEN*
Flat Fee
Use this line type to define the format for printing your flat fee retainer billings.
The fields available for Flat Fee are:
*SCREEN*
(See the appendix titled Invoice Fields for an explanation of each of these fields.)
Matter Information
Use this selection to define the format for printing matter information, such as the matter billing description.
The fields available for Matter information are:
*SCREEN*
(See the appendix titled Invoice Fields for an explanation of each of these fields.)
Service Group
If you want to sum up your service billings by service group, use this selection to define the service group format. You can also use this line type to group together the individual service WIP billings by service group.
The fields available for Service Group are:
*SCREEN*
(See the appendix titled Invoice Fields for an explanation of each of these fields.)
Service Summary
If you want to summarize your service billings by service number, use this selection to define the service summary format. You can also use this line type to group together the individual service WIP billings by service number.
The fields available for Service Summary are:


(See the appendix titled Invoice Fields for an explanation of each of these fields.)
Service WIP Headers
Use this line type to enter text for the headers of your service WIP billings.
The fields available for Service WIP Header are:
*SCREEN*
When you select these fields to print, you are selecting the title of the field to print, as indicated by the quotes surrounding each field. These are the headers that would usually be printed above the service WIP billings. You can use these or enter your own text.
Service WIP
Use this line type to enter format information for printing your service WIP billings. The service WIP items that you have selected for billing will be printed using the information that you enter here.
|
Note |
As explained in the chapter titled Billing, WIP items that have been selected for billing with a W (bill without printing) will not be printed on the invoice, although their charges will be included in invoice totals. |
The fields available for Service WIP are:
*SCREEN*
(See the appendix titled Invoice Fields for an explanation of each of these fields.)
Fixed Fee Services
Select this line type to define the format of fixed fee bills (for matters that have service billing terms of "fixed fee"). This line type will also be used to print fixed fee bills for matters which have both service billing terms of "fixed fee" and expense billing terms of "fixed fee".
The fields available for Fixed Fee Services are:
*SCREEN*
(See the appendix titled Invoice Fields for an explanation of each of these fields.)
Contingent Fee Services
Use this line type to define the format for printing your contingent fee service billings (for matters that have service billing terms of "contingent fee"). This line type will also be used to print contingent fee bills for matters which have service billing terms of both "contingent fee" and expense billing terms of "contingent fee".
The fields available for Contingent Fee Services are:
*SCREEN*
(See the appendix titled Invoice Fields for an explanation of each of these fields.)
Service Totals
Select this line type to lay out the service totals. If you do not wish to show any detailed billing information for services, this is the only "services" line type that you need to define in the invoice.
The fields available for Service Totals are:
*SCREEN*
(See the appendix titled Invoice Fields for an explanation of each of these fields.)
Expense Group
If you want to sum up your expense billings by expense group, use this selection to define the expense group format. You can also use this line type to group together the individual expense WIP billings by expense group.
The fields available for Expense Group are:
*SCREEN*
(See the appendix titled Invoice Fields for an explanation of each of these fields.)
Expense Summary
If you want to summarize your expense billings by expense number, use this selection to define the expense summary format. You can also use this line type to group together the individual expense WIP billings by expense number. (See the appendix titled Predefined Data for formats showing the different ways that this line type can be used.)
The fields available for Expense Summary are:
*SCREEN*
(See the appendix titled Invoice Fields for an explanation of each of these fields.)
Expense WIP Header
Use this line type to enter text for the headers of your expense WIP billings.
The fields available for Expense WIP Header are:
*SCREEN*
When you select these fields to print, you are selecting the title of the field to print, as indicated by the quotes surrounding each field. These are the headers that would usually be printed above the expense WIP billings. You can use these or enter your own text.
Expense WIP
Use this line type to enter format information for printing your expense WIP billings. The expense WIP items that you have selected for billing will be printed using the information that you enter here.
|
Note |
As explained in the chapter titled Billing, WIP items that have been selected for billing with a W (bill without printing), will not be printed on the invoice, although their charges will be included in invoice totals. |
The fields available for Expense WIP are:
*SCREEN*
(See the appendix titled Invoice Fields for an explanation of each of these fields.)
Fixed Fee Expense
Select this line type to define the format of fixed fee bills (for matters that have expense billing terms of "fixed fee", but service , billing terms of some other kind).
The fields available for Fixed fee Expense are:
*SCREEN*
(See the appendix titled Invoice Fields for an explanation of each of these fields.)
Contingent Fee Expense
Use this line type to define the format for printing your contingent fee expense billings (for matters that have expense billing terms of "contingent fee", but service billing terms of some other kind).
The fields available for Contingent Fee Expense are:
*SCREEN*
(See the appendix titled Invoice Fields for an explanation of each of these fields.)
Expense Totals
Select this line type to lay out the expense totals. If you do not wish to show any detailed billing information for expenses, this is the only "expenses" line type that you need to define in the invoice.
The fields available for Expense Totals are:
*SCREEN*
(See the appendix titled Invoice Fields for an explanation of each of these fields.)
Matter Totals
With this line type, you choose which matter totals fields you want to print on the invoice. If you do not wish to show any detailed billing information for services or expenses, you can define the matter totals format without laying out any of the "service" and "expense" line types.
The fields available for Matter Totals are:
*SCREEN*
(See the appendix titled Invoice Fields for an explanation of each of these fields.)
Invoice Totals
Use this line type to choose the invoice totals fields you want to print on the invoice. If you do not wish to show detailed billing information on the invoice, this is the only line type that you need to define.
The fields available for Invoice Totals are:
*SCREEN*
(See the appendix titled Invoice Fields for an explanation of each of these fields.)
Ending Balance
(This selection is not available if you specified in Control information that combined invoice/statements are not used.)
When you are using combined invoice/statements, you can use this section of the line item area to show the statement balance due, dunning messages, aging periods, etc.
The fields available for Ending Balance are:
*SCREEN*
(See the appendix titled Invoice Fields for an explanation of each of these fields.)
Numeric Fields
Earlier, in the "Header Area, First Page" section, an example was given of a numeric field ("Invoice number") which did not have all characteristics that a numeric field could have.
To show all characteristics of numeric fields, a full example is given here:
|
Example |
From the Invoice totals screen, type 8 to select the "Invoice net due" field |
You see:
*SCREEN*
Enter the information as follows:
2. Row
Specify in which row to print this field. Format: 99 Example: Type 3
3. Column
Specify the starting column in which to print this field. Format: 999 Example: Type 59
4. Number of integers
Enter the number of integers (digits to the left of the decimal point) you want to print in this field, up to the maximum shown.
|
Format |
(As displayed for the selected field) |
|
Example |
Press ENTER for the maximum of 9 |
5. Use commas ?
(If commas are not appropriate to this field, you are not given the option of using commas.)
Answer Y to use commas.
|
Example |
Type Y |
6. Decimals
(If the number has no decimal places, this choice does not appear.)
Enter the number of decimal places you want to print, up to the maximum shown.
|
Format |
(As displayed for the selected field) |
|
Example |
Press ENTER for the maximum of 2 decimals |
7. Show negative with
(If the number has decimal places, but negative numbers are not allowed , "(N/A)" displays. If the number doesn't have decimal places, and negative numbers are not allowed, this choice does not appear at all.)
Enter M to show negative numbers with a minus sign, or P to show them in parentheses.
If you select M, then enter R to have the minus sign on the right, or L to have it on the left.
If you select P, then enter F to display the parentheses in fixed positions, or N to display the parentheses next to the number. For example, if the number were negative 35, typing F would result in ( 35.00); typing N would result in (35.00).
If you select C, then enter C to display a "CR" to the right of the number. For example, if the number were negative 35.00, typing C would result in 35.OOCR.
|
Format |
1 character |
|
Example |
Type C |
8. Print when zero ?
Answer Y to print a zero when the number is zero, or answer N to leave the field blank when the number is zero.
|
Example |
Type Y |
When you finish entering field 8, an example appears to the right to show what your number will look like when printed. A negative number example is also shown if negative numbers are allowed.
The screen now appears as:
*SCREEN*
Example Information:
At this point, if you are entering example information while learning the T/B package, you can use the "Format Specifications List" sample at the end of this chapter as a guide to completing the invoice format.
You do not have to complete this example invoice format (unless you want the practice), since several predefined formats are included with the PBS install.
Adding, changing, or deleting first page footer area fields and texts is handled in exactly the same way as header area fields and texts.
On the first screen enter this field:
1. Format #
Enter the format number of the form you wan to modify.
On the next screen you enter the fields for the format. Select ENTER and "Field number to change ?"and you see:
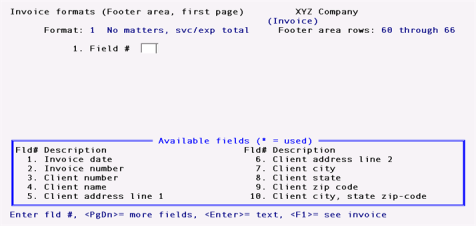
(See the appendix titled Invoice Fields for an explanation of each of these fields.)
The next group of first page footer fields you can see by pressing PgDn:

The last field is field 21 which is the Attachment page number.
If the format for the footer area of additional invoice pages will be the same or similar to that of the first page, use this function to copy the first page format. Then use the Footer area, additional pages function to make any changes necessary to the new format.
Select
Copy first page footer area directly from the Invoice formats menu.
If you are using the menu bar, you will be asked to enter the format # that contains the footer area you want to copy. After you have chosen the format, the format for the first page footer area is copied to the footer area format for additional pages.
If you have already defined the format for the additional page footer area, a warning message will appear to tell you that the existing format will be completely replaced. You are asked "Do you really want to do this ?". If you answer Y, the format of the first page footer area is copied and completely replaces the existing format. Answer N to return to the menu without copying.
A screen appears while the footer area is copied. When the copying is complete, press ESC to return to the menu.
Adding, changing, or deleting footer area fields and texts for additional pages is handled in exactly the same way as header area fields and texts for the first page.
Select
Footer area, additional pages directly from the Invoice formats menu.
On the first screen enter this field:
1. Format #
Enter the format number of the form you wan to modify.
On the next screen you enter the fields for the format. Select ENTER and "Field number to change ?"and you see:
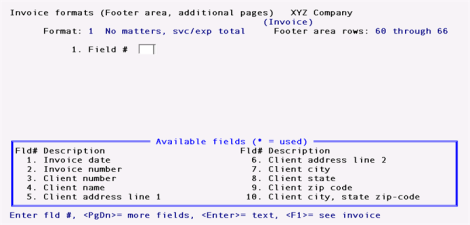
(See the appendix titled Invoice Fields for an explanation of each of these fields.)
There are two more windows of footer fields for additional pages, which you can see by pressing PgDn:

The last field is field 21 which is the Attachment page number.
Select
Verify from the Invoice formats menu.
On the first screen enter this field:
1. Format #
Enter the format number of the form you wan to modify.
Select ENTER and "Field number to change ?"and the printer selection menu appears. After you select a printer, the program immediately begins checking the invoice format for errors. If you are printing the error report on your printer, you see a screen similar to this:
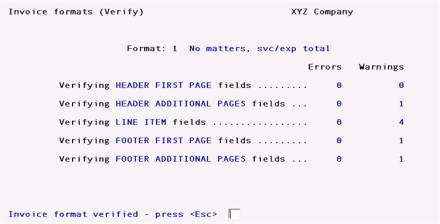
At the end of the verification, an error report is printed. (Some messages shown on the report are only warnings; these are identified by "*WARNING ONLY *".)
You must correct errors before you can use an invoice format. You can either correct warnings or leave them as they are.
|
Note |
You must verify a format and correct any errors on it first, before you can print a sample invoice using it. |
Select
Sample invoice from the Invoice formats menu.
A screen will appear to allow you to select the line item options for your sample invoice.
Then a screen appears telling you to enter the printer control code. Follow the instructions on the screens that follow.
|
Note |
You must have at least one printer control code on file in order to print sample invoices. |
A sample will print for the first page, for one additional page, and for an envelope (if specified).
After one sample invoice prints, you can print another or press ESC to exit.
If you have already created an invoice format which you want to keep, and you are going to add another similar format, use this option to copy the existing format. Then make changes to the copy.
Select
Copy from the Invoice formats menu.
A screen appears for you to enter the number of the format to copy from and the number to be assigned to the new format.
Enter the information as follows:
1. Copy from format #
Enter the number of the format you want to copy from, or use the option:
Option: F1 To scan through the formats on file
|
Format |
99 |
|
Example |
Type 4 |
2. Copy to format #
Enter the number you wish to assign to the new format. If you enter the number of a format already on file, you see an error message informing you of this, and that you must delete the existing format first before you can use this format number to copy to.
Enter another format number that is not already used, then enter a description of the new format.
|
Format |
99 (format #) 25 characters (format description) |
|
Example |
Type 11, then type Attachment |
When the format has been copied, press ESC.
Use this function to delete invoice formats which you no longer want to keep.
Select
Delete from the Invoice formats menu.
A screen appears for you to enter the format number of the format to delete. Enter the number, or use the option:
|
F1 |
To scan through the formats on file |
|
SF1 |
To scan through previous formats on file |
To delete a format, answer Y when you are asked whether it is OK to delete it. Otherwise, press ENTER to not delete it.
If you answer Y, a message appears stating that the format has been deleted. Enter the number of another to be deleted, or press ESC.
Use this option to print a full list of the exact specifications that define one or more invoice formats. This is different from a sample invoice—a sample invoice shows what the invoice will look like. The format specifications show all the information you entered to get the invoice to look like that.
Select
Format specifications from the Invoice formats menu.
A screen appears for you to enter the starting and ending numbers of the formats you wish to print specifications for.
1. Starting format #
2. Ending format #
Enter the range of the formats you want to print. Follow the screen instructions.
|
Example |
Press F2 at both fields |
Any change ?
Enter Y to make changes or N to continue printing the report.